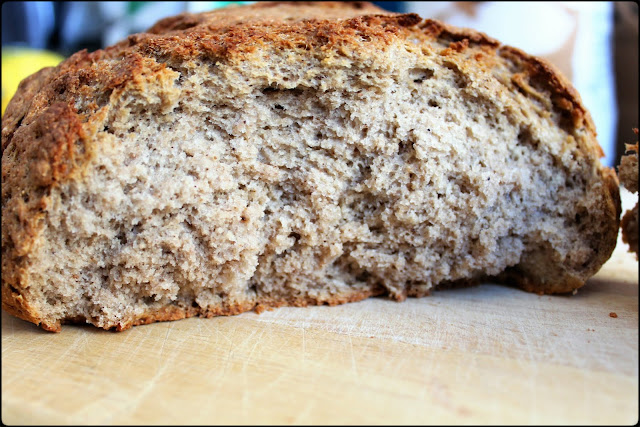
Hogaza de harina de castañas y trigo sarraceno / Loaf of chestnut flour and buckwheat
¡Cuánto tiempo! Ya tenía yo ganas de una receta de pan.
Hay una pequeña tienda en mi barrio que vende producto gallegos y del norte de Castilla y León, a la que voy a comprar castañas, pan, empanadas de manzana... El caso es que el otro día vi que tenían harina de castaña y me decidí a comprarlo.
Hace tiempo, en la panadería de mi calle compraba un pan de castaña riquísimo, pero hace tiempo que no lo hacen, supongo que es caro y tiene poca demanda. El caso es que tiene un sabor muy agradable, es suave y duzón, lo cual me gusta mucho. Después del experimento de hoy, creo que volveré a hacerlo, pero iré cambiando las proporciones de harina y veremos como va quedando.
Espero os guste.
Receta para una hogaza de 1 kg
Tiempo aproximado de preparación: 1 noche + 1 hora + 50 minutos de horneado + 2 horas enfriando.
Ingredientes:
Para el prefermento:
Cómo lo hago:

Notas:

How long! I already wanted a bread recipe.
There is a small shop in my neighborhood that sells Galician products and from the north of Castilla y León, to which I am going to buy chestnuts, bread, apple "empanada"... The fact is that the other day I saw that they had chestnut flour and I I decided to buy it.
Some time ago, in the bakery of my street I bought a delicious chestnut bread, but they have not done it for a long time, I suppose it is expensive and has little demand. The fact is that it has a very pleasant taste, it is mild and duchy, which I like very much. After today's experiment, I think I'll do it again, but I'll change the proportions of flour and we'll see how it looks.
I hope you like it.

Recipe for a loaf of 1 kg
Approximate preparation time: 1 night + 1 hour + 50 minutes of baking + 2 hours cooling.
Ingredients:
For the preferment:
Notes:
Hay una pequeña tienda en mi barrio que vende producto gallegos y del norte de Castilla y León, a la que voy a comprar castañas, pan, empanadas de manzana... El caso es que el otro día vi que tenían harina de castaña y me decidí a comprarlo.
Hace tiempo, en la panadería de mi calle compraba un pan de castaña riquísimo, pero hace tiempo que no lo hacen, supongo que es caro y tiene poca demanda. El caso es que tiene un sabor muy agradable, es suave y duzón, lo cual me gusta mucho. Después del experimento de hoy, creo que volveré a hacerlo, pero iré cambiando las proporciones de harina y veremos como va quedando.
Espero os guste.

Receta para una hogaza de 1 kg
Tiempo aproximado de preparación: 1 noche + 1 hora + 50 minutos de horneado + 2 horas enfriando.
Ingredientes:
Para el prefermento:
- 150 gr de harina de trigo sarraceno
- 100 ml de agua tibia
- 5 gr de levadura fresca sin glúten
- 2 tazas de harina de castaña

- 2 tazas de harina de trigo sarraceno
- 1 taza de agua tibia
- 10 gr de levadura fresca sin glúten
- 5 gr de sal
- 2 cucharadas de aceite de oliva virgen extra

Cómo lo hago:
- La noche anterior preparamos el prefermento. Para ello disolvemos la levadura en el agua tibia y mezclamos con el harina hasta obtener una masa pegajosa. Tapamos (como no uso film transparente, probé con el envoltorio de cera de abejas y encima un trapo de algodón y funcionó perfectamente) y dejamos fermentar en la cocina.
- A la mañana siguiente tamizamos las harinas con la sal. Formamos un "volcán", es decir, amontonamos la mezcla tamizada y hacemos un agujero en el centro. Dentro vamos añadiendo los ingredientes. Primero disolvemos la levadura en el agua tibia y lo añadimos a las harinas, después incorporamos el aceite de oliva. Amasamos.
- Cortamos el prefermento en trozos pequeños y lo vamos añadiendo poco a poco a medida que amasamos.
- Seguimos amasando hasta que obtengamos una masa elástica.
- Hacemos una bola, la untamos con aceite y la dejamos en un bol tapada con un paño de lino y algodón para que fermente. Debe doblar su volumen, esto tardará unos 40 minutos, pero dependerá de la temperatura a la que tengamos nuestra cocina.

- Precalentamos el horno a 180ºC, calor arriba y abajo y dejamos dentro la cazuela cocotte o piedra sobre la que vamos a cocer el pan, para que se caliente.
- Cuando el horno esté caliente, colocamos la masa dentro. Horneamos unos 50 minutos o hasta que el pan esté listo.
- Dejamos enfriar sobre rejilla. En caso de haber usado una cocotte, dejamos el pan 10 minutos antes de sacarlo a la rejilla.


Notas:
- Si usamos una amasadora el proceso es el mismo.
- En caso de cocer el pan sobre una piedra o bandeja, en la parte inferior del horno colocaremos un recipiente con agua y lo dejaremos dentro durante la primera mitad de la cocción de la masa. Con ello conseguiremos que la corteza se endurezca.
- Si usamos una cazuela o cocotte, la taparemos durante la primera mitad de la cocción, par conseguir el mismo efecto.
- Para saber si el pan está listo lo sacamos con cuidado del horno y lo golpeamos, si suena hueco está listo.
How long! I already wanted a bread recipe.
There is a small shop in my neighborhood that sells Galician products and from the north of Castilla y León, to which I am going to buy chestnuts, bread, apple "empanada"... The fact is that the other day I saw that they had chestnut flour and I I decided to buy it.
Some time ago, in the bakery of my street I bought a delicious chestnut bread, but they have not done it for a long time, I suppose it is expensive and has little demand. The fact is that it has a very pleasant taste, it is mild and duchy, which I like very much. After today's experiment, I think I'll do it again, but I'll change the proportions of flour and we'll see how it looks.
I hope you like it.

Recipe for a loaf of 1 kg
Approximate preparation time: 1 night + 1 hour + 50 minutes of baking + 2 hours cooling.
Ingredients:
For the preferment:
- 5,3 Oz of buckwheat flour
- 100 ml of warm water
- 0,2 Oz of fresh yeast without gluten
- 2 cups chestnut flour

- 2 cups buckwheat flour
- 1 cup warm water
- 0,35 Oz of fresh yeast without gluten
- 0,2 Oz of salt
- 2 tablespoons extra virgin olive oil

- The night before we prepare the preferment. To do this we dissolve the yeast in the warm water and mix with the flour until a sticky dough is obtained. Cover (as I do not use transparent film, I tried with the beeswax wrapper and on top of a cotton cloth and it worked perfectly) and let it ferment in the kitchen.
- The next morning sift the flour with salt. Form a "volcano", that is, pile the sieved mixture and make a hole in the center. Inside add the ingredients. First we dissolve the yeast in the warm water and add it to the flours, then we add the olive oil. Knead.
- Cut the preferment into small pieces and add it little by little as we knead.
- Continue kneading until we get an elastic dough.
- Make a ball, spread it with oil and leave it in a bowl covered with a linen or cotton cloth to ferment. It should double the volume, this will take about 40 minutes, but it will depend on the temperature at which you have your kitchen.
- Preheat the oven to 180ºC/356 F, heat up and down and leave inside the cocotte or stone casserole on which we are going to bake the bread, so that it is heated.
- When the oven is hot, put the dough inside. Bake about 50 minutes or until the bread is ready.
- Let cool on rack. In case of using a cocotte, w leave the bread 10 minutes before removing it to the rack.
Notes:
- If we use a kneader the process is the same.
- In case of baking the bread on a stone or tray, at the bottom of the oven place a container with water and leave it inside during the first half of the dough cooking. With this we will get the crust to harden.
- If we use a casserole or cocotte, we will cover it during the first half of cooking, to achieve the same effect.
- To know if the bread is ready we carefully take it out of the oven and hit it, if it sounds hollow it is ready.
Comentarios
Publicar un comentario